

A guide walks you through setup
From installation and turning the extension on in Mail to reading the verdicts and checking that everything works — all in one place.
Free for 14 days, then a monthly or yearly auto-renewing subscription. About pricing
Installation and the getting-started guide
Download LinkSentinel from the App Store and launch it, and the five-page "Get Started with LinkSentinel" guide opens. Click "Next" at the bottom of each page and you'll be up and running in a few minutes.
Download from the App Store and launch
Open the Mac App Store, search for "LinkSentinel" and click "Get" or "Install". Launch LinkSentinel from the Applications folder: its icon appears in the menu bar at the top right of the screen, and the "Get Started with LinkSentinel" guide opens a moment later.
Welcome: how to read the verdicts, and "LinkSentinel judges cautiously"
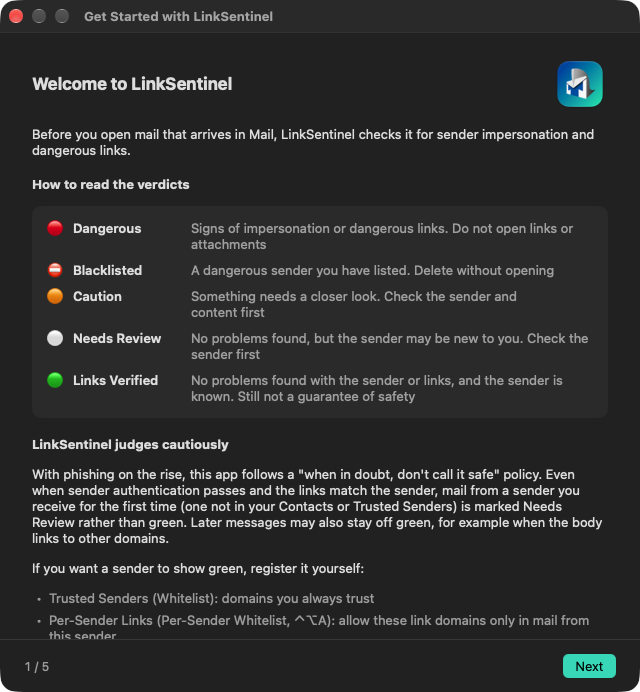
The first page explains the five verdicts and LinkSentinel's cautious policy. Mail from a sender you receive for the first time is marked Needs Review rather than green, even when nothing looks suspicious. If you want a sender to show green, register it yourself in Trusted Senders (Whitelist) or Per-Sender Links (Per-Sender Whitelist). Green is not a guarantee of safety.
Subscription: start the free trial
On the "Subscription" page, click "Open Subscription Screen", choose the Yearly or Monthly plan and click "Start Free Trial" (free for 14 days; cancel at least 24 hours before the trial ends and you will not be charged). Mail is checked while your subscription is active. If you subscribe later, you can still click "Next" and set up Mail in the meantime. You can also open the subscription screen from "Subscribe…" in the menu bar icon.
Turn On the Extension in Mail
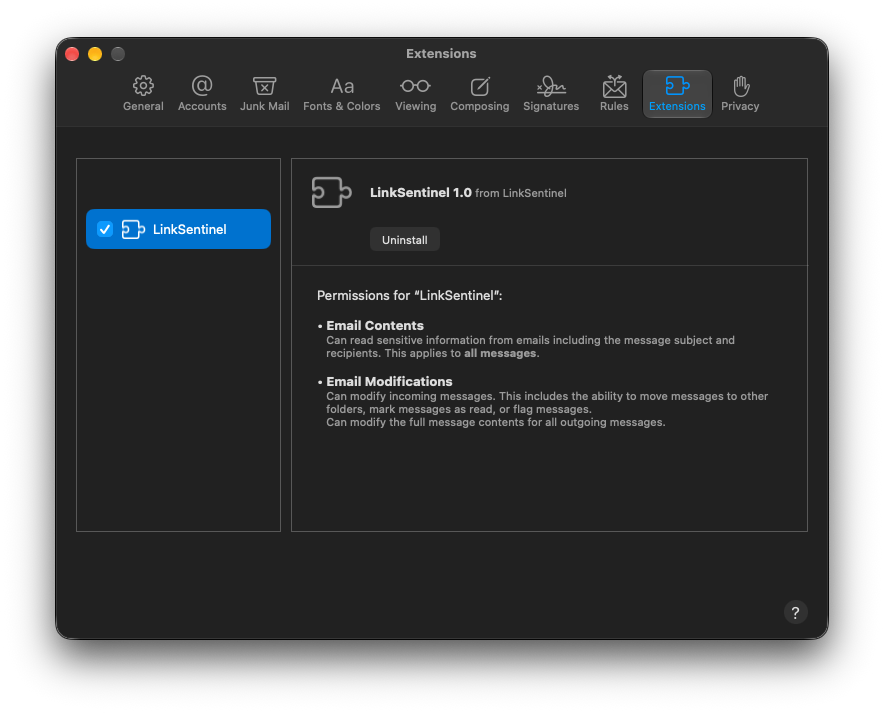
Click "Open Mail", then in Mail's menu bar choose "Mail" → "Settings…" → "Extensions" and check "LinkSentinel". After checking the box, open any message in Mail; the guide then shows "A response from the extension was received" (before you subscribe, it shows "You can confirm this after subscribing.").
Notifications and Permissions
Click "Allow Notifications" to receive verdicts as notifications (choose which verdicts notify you in Settings). "Allow Access to Contacts" (optional, recommended) lets people in your Contacts be treated as known senders, so their mail is less likely to be marked Needs Review. The "Optional permissions" — Automation ("Allow Control of Mail") and Full Disk Access — are used by "Actions for the selected message in Mail" in the menu and to show account names in the history's Mailbox filter. You can also grant them later from "Check Setup…" in the menu.
Done
On the "You're All Set" page, click "Done". If you finish without checking "Don't show this guide at launch for the next two weeks", the guide appears again at the next launch. You can open it any time from "Get Started with LinkSentinel…" in the menu.
Checked automatically as mail arrives
LinkSentinel analyzes each message automatically when it arrives. Messages that have not been analyzed yet are analyzed when you open them. Nothing else to do (while you are subscribed or in the free trial).
What appears where
Banner at the top of the message
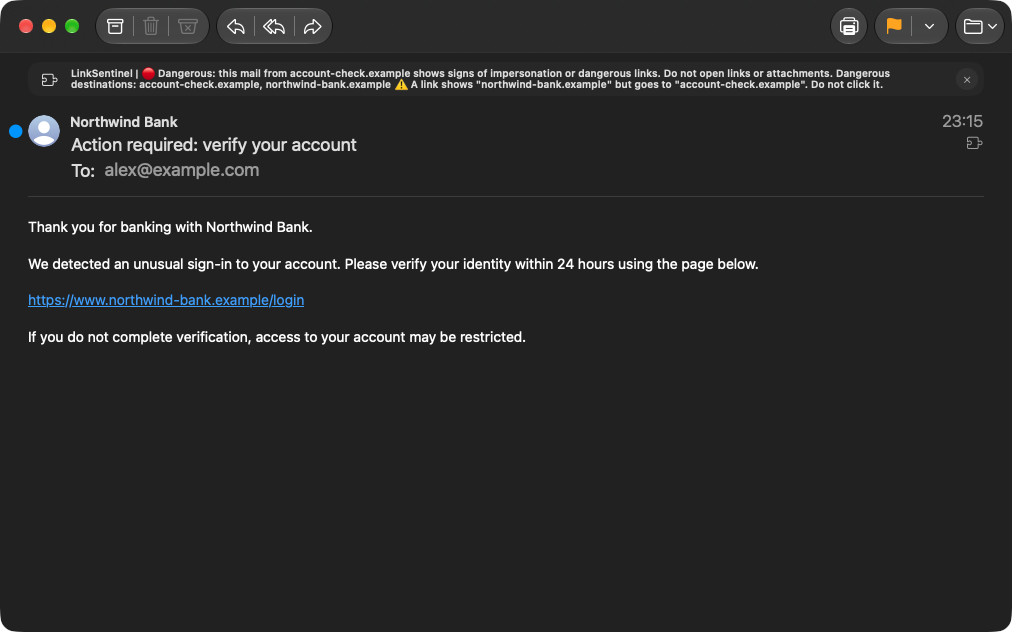
When you open a message, a banner appears at the top. It reads "verdict → sender domain (the part after @ in the sender's address) → what to do", so you see the conclusion first. Example: "🔴 Dangerous: this mail from example.com shows signs of impersonation or dangerous links. Do not open links or attachments."
Email Analysis History
Press ⌃⌥D (or choose "Email Analysis History" in the menu). The list has four columns: "Verdict / Date", "Sender", "Subject" and "Summary". Select a row to see details such as the real link destinations, sender authentication (SPF / DKIM / DMARC) and the reasons for the verdict. The detail pane's "Allow Links from This Sender", "Trust This Sender" and "Block This Sender" buttons add that message's sender to a list (the right-click menu works too).
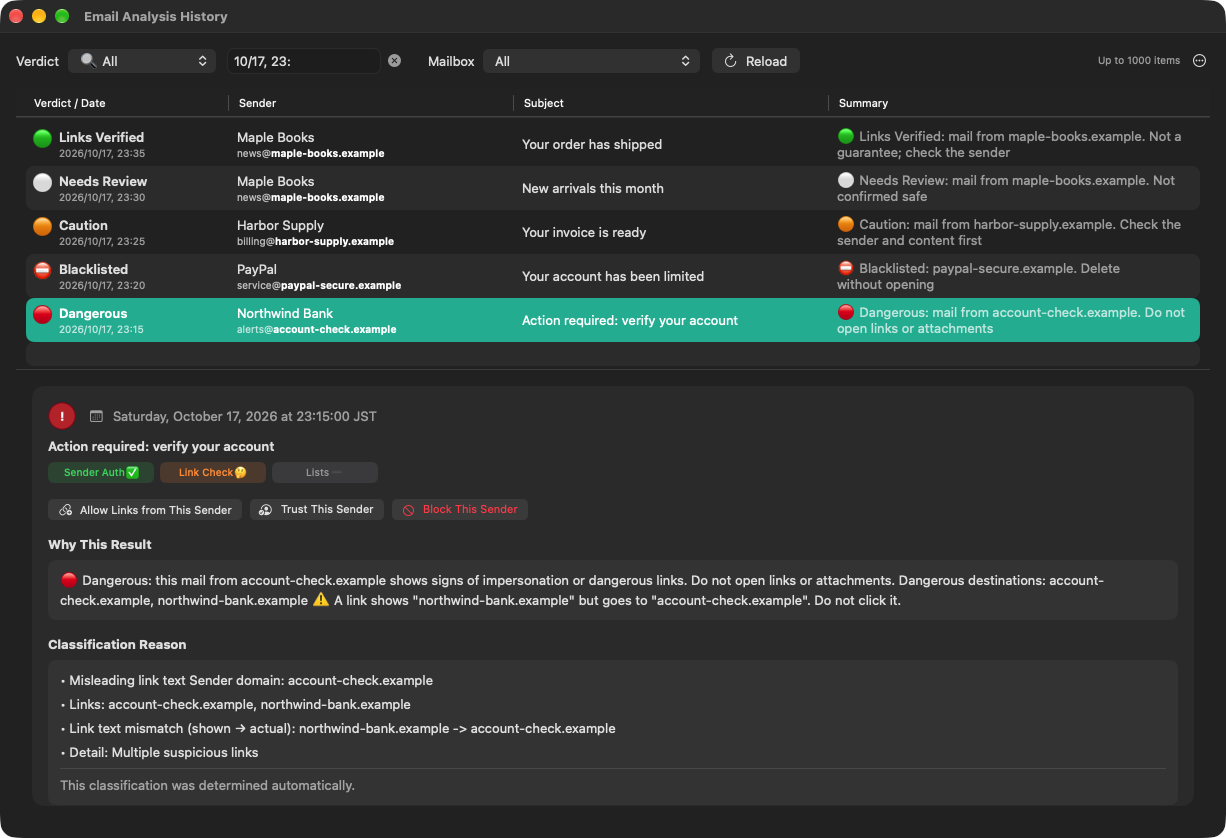
Note: The Email Analysis History shows the real link destinations, whether the sender domain and link domains match, the sender authentication results and the factors that affected the verdict (the latest 1,000 messages; message bodies are not stored). Detected: URLs and Bitcoin addresses in the message body. To delete all history, choose "Clear All History…" from the "…" (More Actions) button at the right end of the toolbar (you are asked to confirm).
Banner types
Note: Besides first-time senders, "Needs Review" also covers messages whose body could not be analyzed (such as attachment-only messages). Mail from a sender registered in Per-Sender Links (Per-Sender Whitelist) is also softened to "Needs Review" when a Watch Domains (Untrusted Domains) match is the only warning.
Note: "Links Verified" means no suspicious signals were detected. It does not guarantee that the link destinations are safe.
Classifications in detail
Each message's risk is shown in one of five colors, so you can decide at a glance.
Note: "Links Verified" means no suspicious signals were detected. It does not guarantee that the link destinations are safe. It may not catch a legitimate site that has been compromised or a brand-new technique. The final decision is yours.
How verdicts are made
To learn in detail how LinkSentinel classifies mail, see the Criteria page.
Frequently Asked Questions (FAQ)
Troubleshooting
First open "Check Setup…" from the menu and look at the "Status" card: Subscription, Mail checking, Extension response and Last analysis. The top line of the menu shows the same status.
"Version" at the bottom of the "General" tab in Settings shows the app version and the version of the extension actually running in Mail. If it says "A different version of the extension is running", quit Mail and open it again.
If it says "No response from the Mail extension yet"
Check that the extension is turned on in Mail
In Mail's menu bar, choose "Mail" → "Settings…" → "Extensions" and make sure "LinkSentinel" is checked. After checking it, open any message in Mail so that a response is recorded.
Restart Mail
Quit Mail completely (Command-Q) and open it again.
Restart your Mac
If the steps above do not help, restart your Mac.
If no banner appears or messages are not judged
Check that your subscription (or free trial) is active
While you are not subscribed (before starting the free trial, or after it expires), mail is not analyzed and no banner is shown. Open the LinkSentinel menu bar icon and check that it shows something like "Subscription: Free trial" or "Subscription: Subscribed". If it shows "Subscribe…", you can open the subscription screen from there. If you have already subscribed with the same Apple ID, try "Restore Purchases".
Check that the menu bar app is running
The menu bar app is needed to check your subscription status and to use settings and shortcuts. If you cannot find the icon, launch LinkSentinel from the Applications folder.
Check LinkSentinel's settings
Choose "Settings…" from the menu and make sure "Check incoming mail" and "Display Analysis Banner in Mail" are on in the "General" tab.
If the banner says "Analyzing"
If the banner reads "LinkSentinel | Analyzing. The result appears the next time you open this message.", wait a moment, select another message, and then open that message again.
Update macOS / Apple Mail
LinkSentinel supports Apple Mail on macOS 15 or later. Make sure macOS and Apple Mail are up to date.
If this does not solve the problem, please reach us through the contact page.
Want to learn more?
The Settings page explains how to reduce false positives and how to manage your domain lists.