

Settings
Start by picking one of the Recommended Settings. Every option and its default is explained below.
How Settings is organized
Open "Settings…" from the LinkSentinel menu bar icon. Settings has two tabs, "General" and "Verdicts & Lists". In "Verdicts & Lists", the top row switches between "Verdicts & Actions" and "Per-Sender Links", and the bottom row between "Trusted Senders", "Blocked Senders" and "Watch Domains". Changes are saved immediately and apply from the next message that arrives.
Both tabs keep the everyday options at the top and the finer options in a collapsible "Advanced Settings" section (closed at first). If you are not sure, the defaults are fine.
Note: The app shows each list with a plain name followed by its traditional name: Trusted Senders (Whitelist), Blocked Senders (Blacklist), Watch Domains (Untrusted Domains) and Per-Sender Links (Per-Sender Whitelist). The verdict names (Dangerous, Caution, Needs Review, Links Verified, Blacklisted) are unchanged.
Note: While you are not subscribed (before starting the free trial or after it expires), only "Subscribe…", "Get Started with LinkSentinel…", "How to Use" and "Quit" are available in the menu bar; Settings, Email Analysis History, shortcuts and the rest are not.
General
Turning mail checking on or off, notifications, the banner, launch at login and version information. Advanced Settings holds country and region top-level domains and shortcuts
Verdicts & Actions
Recommended Settings (choose one of four). Advanced Settings holds per-verdict actions, classification overrides, Domain Source Controls and custom list backup
Per-Sender Links
Allow these link destinations only in mail from this sender (Per-Sender Whitelist).
Trusted Senders
Domains you trust (Whitelist)
Blocked Senders
Domains always treated as dangerous (Blacklist)
Watch Domains
Domains handled with care because they are often abused (Untrusted Domains), including frequently abused domain endings such as .top and .xyz
To see how verdicts are made, read the Criteria.
General
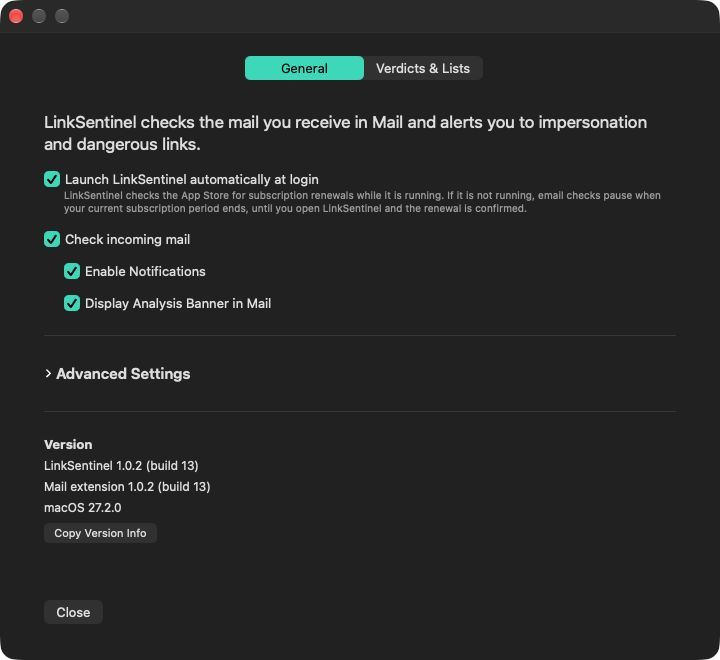
Launch LinkSentinel automatically at login
Default: OffStarts the menu bar app (settings, history, shortcuts and notifications) when you log in. The Mail extension runs when Mail starts, regardless of this setting. LinkSentinel checks the App Store for subscription renewals while it is running, so if this stays off, mail checking pauses after your subscription period ends until you open LinkSentinel and the renewal is confirmed.
Check incoming mail
Default: OnThe master switch for LinkSentinel. When it is off, analysis, banners, notifications, history recording and moving to Junk all stop, and the top line of the menu reads "Mail checking is off (change in Settings)".
Enable Notifications
Default: OnThe master switch for notifications in macOS Notification Center. Which verdicts notify you is chosen under "Recommended Settings" (or Advanced Settings) in "Verdicts & Actions". The default, "Watch only", sends no notifications.
Display Analysis Banner in Mail
Default: OnShows a banner with the verdict and the reasons at the top of a message when you open it. If you turn it off, analysis continues and the results remain available in the Email Analysis History.
Version
At the bottom of the tab: the app version, the version of the extension actually running in Mail, and the macOS version ("Copy Version Info" copies them for support requests). The extension version is recorded when Mail processes a message. If you updated the app but have not restarted Mail, it shows "A different version of the extension is running"; quit Mail and open it again.
Advanced Settings (General)
Click "Advanced Settings" to expand it.
🌐 Country and Region Top-Level Domains
Default: Russia and China "Dangerous", others "Normal"For Russia (.ru / .su / .рф), China (.cn / .中国 / .中國), Hong Kong, Macau, North Korea, Iran and Belarus, choose how to treat a message whose sender or link destination uses that country's or region's domains (the domain ending). Your choice adds or removes the matching rows in Blocked Senders (Blacklist) or Watch Domains (Untrusted Domains).
Note: If Simplified Chinese or Russian is among your Mac's preferred languages, that country starts as "Normal" (on first launch; choices you have already made are not changed).
Note: If the target list is disabled under "Domain Source Controls" (Advanced Settings in "Verdicts & Actions"), a warning and a "Move to an enabled list" button are shown.
💡 If you deal with companies, universities or others in China or Russia, choose "Normal".
Shortcut keys
Default: ⌃⌥ (Control + Option) + a keyWith a message selected in Mail, these do the same as "Actions for the selected message in Mail" in the menu. Before anything changes, a confirmation shows the subject and sender of the target message. You can change the keys.
Note: Nothing is changed if the message has not been judged yet or no message is selected.
Note: Turn on "Open the analysis window when a shortcut runs" to show the Email Analysis History after an addition (default: off).
Restore All General Settings
Turns the checkboxes in the "General" tab on (except "Open the analysis window when a shortcut runs") and resets the shortcut keys to their defaults (⌃⌥D / A / S / X), after a confirmation dialog. "Domain Source Controls" in "Verdicts & Actions" are also all turned back on. The contents of your lists and the country and region settings are not changed.
Verdicts & Actions
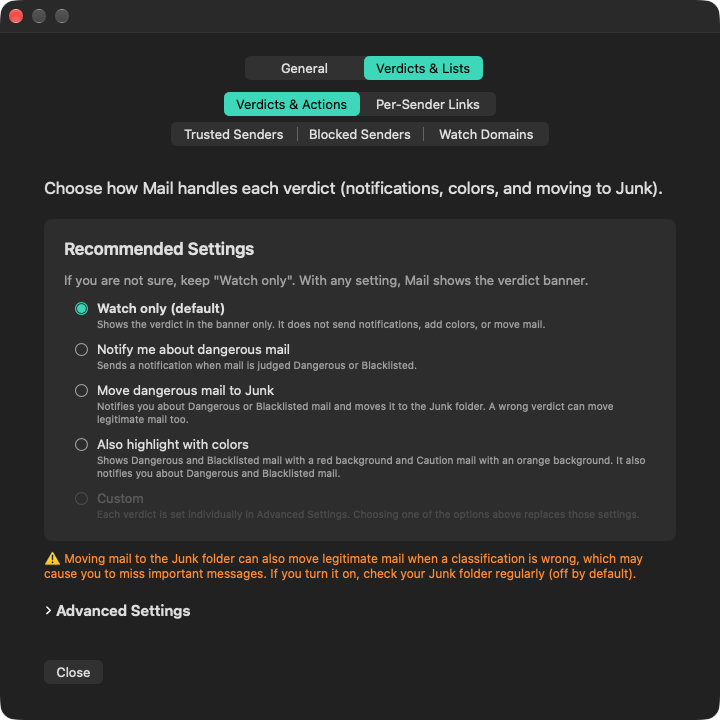
In "Verdicts & Actions" on the "Verdicts & Lists" tab, choose how Mail handles each verdict (notifications, colors, and moving to Junk).
Recommended Settings
Default: Watch onlyPick one of four options and the actions for every verdict are set at once. If you are not sure, keep "Watch only". With any setting, Mail shows the verdict banner.
| Recommended setting | ⛔️ Blacklisted / 🔴 Dangerous | 🟠 Caution | ⚪️ Needs Review / 🟢 Links Verified |
|---|---|---|---|
| Watch only (default) | Nothing | Nothing | Nothing |
| Notify me about dangerous mail | Notification | Nothing | Nothing |
| Move dangerous mail to Junk | Notification + move to Junk | Nothing | Nothing |
| Also highlight with colors | Red background + notification | Orange background | Nothing |
Note: If you change verdicts individually in Advanced Settings, "Custom" is shown ("Custom" cannot be chosen). Choosing one of the options above replaces those settings.
Note: Notifications are delivered only when "Enable Notifications" in "General" is on.
Note: Moving to Junk, marking as read and flags are applied when mail arrives (simply opening a message already in your inbox does not move it).
Because classification is automatic, legitimate mail can be moved to the Junk folder by mistake. Moved messages no longer appear in your inbox, so you may miss important mail. Moving is off by default, and a confirmation dialog appears when you turn it on. If you enable moving, check your Junk folder regularly. Moved messages are also listed in the Email Analysis History (⌃⌥D).
Advanced Settings (Verdicts & Actions)
Click "Advanced Settings" to expand it (it is already open when Recommended Settings shows "Custom").
Actions for each verdict
For each verdict you can set a flag or background color, a notification, moving to the Junk folder and marking as read individually. The defaults ("Watch only") are:
| Verdict | Flag / Background Color | Notification | Move to Junk Folder | Mark as Read |
|---|---|---|---|---|
| ⛔️ Blacklisted | None | Off | Off | Off |
| 🔴 Dangerous | None | Off | Off | Off |
| 🟠 Caution | None | Off | Off | Off |
| 🟢 Links Verified | None | Off | — | — |
| ⚪️ Needs Review | No actions (no settings). Shown in the banner and the history | |||
Classification overrides
Adjust how far Trusted Senders (Whitelist) and Contacts are trusted. Whatever you choose, a Blocked Senders (Blacklist) match always takes precedence.
Treat senders found in Contacts as Links Verified
Default: OnSenders in your macOS Contacts are marked Links Verified as long as there are no other warnings. An explicit DMARC failure or a reply address (Reply-To) pointing to a different free-mail address still results in Caution (protection against impersonated contacts).
Note: Requires permission to access your macOS Contacts ("Allow Access to Contacts" in the getting-started guide, or "Check Setup…" in the menu).
Always treat whitelisted senders as Links Verified (ignore all checks)
Default: OffMail from a domain in Trusted Senders (Whitelist) is marked Links Verified even if authentication fails or it contains suspicious links or Bitcoin addresses.
⚠️ This lets spoofed mail through as well, so normally leave it off. When it is on, the next two options have no effect.
Treat whitelisted senders as Links Verified when authentication succeeds
Default: OnApplies when the sender is in Trusted Senders (Whitelist) and at least one of the checks that help verify where a message came from (SPF, DKIM or DMARC) passes and matches the part after @ in the sender's address (the sender domain). A Reply-To pointing to a different free-mail address still results in Caution.
Treat whitelisted senders as Links Verified unless other warnings appear
Default: OnEven when authentication cannot be confirmed, the message is marked Links Verified if there are no warnings such as suspicious links or Watch Domains (Untrusted Domains). An explicit DMARC failure or a Reply-To pointing to a different free-mail address still results in Caution.
Treat matching From and link domains as Links Verified
Default: OnThe message is marked Links Verified when every link in the body points to the sender's domain (or a domain of the same company) and there are no other warnings. A first-time sender is marked Needs Review, and an explicit DMARC failure or a Reply-To pointing to a different free-mail address results in Caution.
Treat Bitcoin addresses in a message as Dangerous
Default: OnA valid Bitcoin address (starting with 1, 3 or bc1) makes the message Dangerous. This is a countermeasure against extortion mail demanding payment.
Domain Source Controls
For each list you can turn the default (bundled with the app) and custom (added by you) versions on or off separately. Lists that are off are not used for verdicts, and the list pane shows "This list is not used for verdicts right now."
Trusted Senders (Whitelist)
Domains you trust
Blocked Senders (Blacklist)
Domains always treated as dangerous
Watch Domains (Untrusted Domains)
Domains treated as dangerous
Custom List Backup
"Export" writes the lists you added yourself (Trusted Senders, Blocked Senders, Watch Domains and Per-Sender Links) to a single JSON file, which you can use to move to another Mac or to restore them. With "Import", choose "Merge" with your existing lists or "Replace" them. The built-in lists and verdict settings are not included. If you have not added any entries, a message tells you so ("Export Anyway" is also available).
"Restore All Filter Settings" in Advanced Settings resets the Verdicts & Actions settings, such as per-verdict actions and classification overrides, to their defaults (after a confirmation dialog; your lists are not changed).
Editing the lists (common)
The "Trusted Senders", "Blocked Senders" and "Watch Domains" panes show the lists you added yourself (custom lists) in a table.
- Add: type in the "Domain to add (e.g. example.com)" field and click "Add". You can paste a URL or an email address; only the domain is registered (
https://www.example.com/loginandinfo@example.comboth becomeexample.com). - A domain also matches its subdomains (
example.commatchesmail.example.com, but notnotexample.com). If an entry is already covered by an existing domain, "Already registered" is shown and nothing is added. - Parts shared by many sites, such as
co.uk(public suffixes), cannot be added. - Regular expressions are supported (full match). Input containing regular expression symbols is registered after the "Register as a regular expression?" confirmation, and its "Type" column shows "Regex". Example:
^.+\.example\.co\.jp$ - Delete: use the "−" button at the end of a row, or "Delete…" in the right-click menu. You can also select several rows and choose "Delete N Selected Entries…". A confirmation dialog always appears. Because these are lists you build up yourself, there is no "clear all" button.
- "Filter" narrows the rows. "Edit as Text…" lets you edit the list directly as a JSON array.
- Built-in lists: below the table you see "Built-in list: N entries (version …)". "Show and Edit Built-in List (Advanced)…" lets you view and edit it, but the built-in lists are the foundation of the verdicts, so normally leave them unchanged and add to your own list instead. When an app update brings a newer version, a dialog asks whether to overwrite it.
Per-Sender Links (Per-Sender Whitelist)
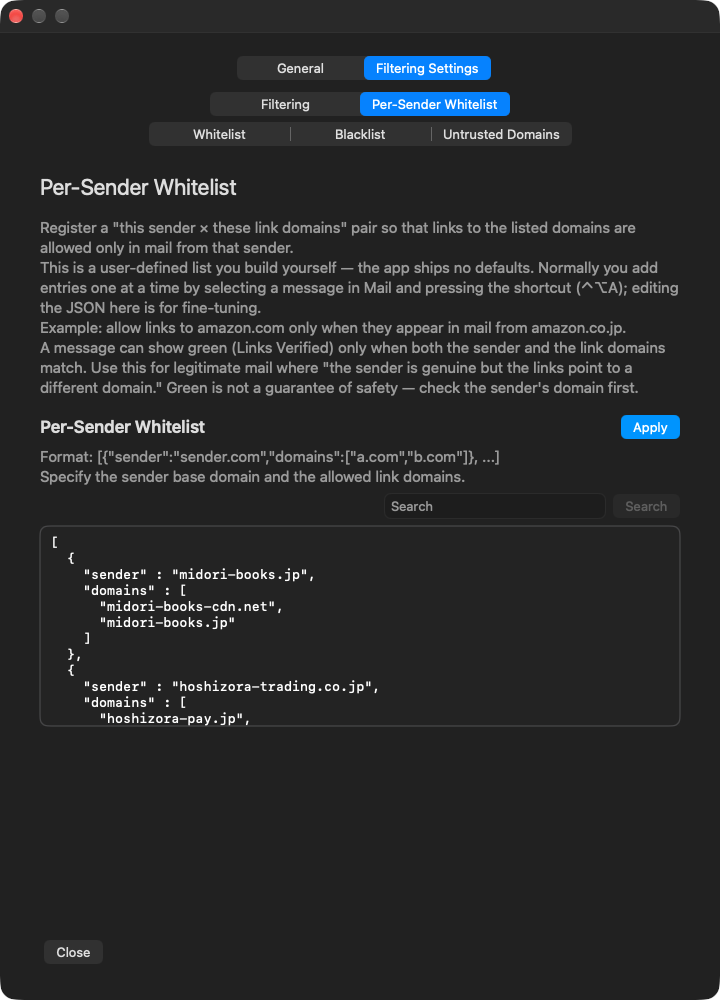
Allow these link destinations only in mail from this sender. This keeps legitimate mail from being flagged again and again when the sender is genuine but the links point to a different domain, such as a mail delivery service.
- Select a message in Mail and press ⌃⌥A ("Allow Links from This Sender…" in the menu) to register its sender and link destinations together. You can also use "Allow Links from This Sender" in the detail pane of the Email Analysis History, or the right-click menu.
- Settings shows a two-column table, "Sender" and "Allowed link destinations". With "Add…" you enter the sender domain and the allowed link destinations (separated with commas or new lines). The sender is registered by its base domain (e.g. mail.example.com → example.com), and the sender's own domain is added to the destinations automatically. Regular expressions cannot be used.
- When the sender and every link destination in the body match a registration, and the Reply-To has the same domain as the sender (or there is no Reply-To), the message is marked "Links Verified". This takes precedence over every warning except the blacklist.
- If the message also contains unregistered link destinations, it is not marked green. If the only reason was a Watch Domains match (such as .cn), the verdict is softened to "Needs Review".
- This list has no default entries. Rows are deleted with a confirmation, and there is no "clear all" button (you can also edit it directly with "Edit as Text (JSON)…").
Trusted Senders (Whitelist)
Register the domains of senders and sites you trust. Whether they appear in the From, an embedded link, or the Reply-To, they are less likely to be flagged (judged in favor of safety). Registration is not a guarantee of safety.
- Select a message in Mail and press ⌃⌥S ("Trust This Sender…"), or use "Trust This Sender" in the detail pane of the Email Analysis History, to add the sender's domain. Adding every link destination of a message at once has been removed (it would allow shared hosting that anyone can publish on, for every sender). To allow link destinations, use Per-Sender Links (⌃⌥A), which limits them to that sender.
- Anyone can send from a free-mail domain such as gmail.com, so "Trust This Sender" in the history does not add it. To mark a specific person as known, add them to macOS Contacts.
- Built-in list: government agencies, financial institutions, e-commerce, transport, telecom and IT services in Japan and abroad. Free-mail domains (such as gmail.com) are not included.
Blocked Senders (Blacklist)
Register domains you want to block. When the sender, a link in the body or the Reply-To matches, the message is classified as "Blacklisted", ahead of every other setting.
- Select a message in Mail and press ⌃⌥X ("Block This Sender…") to add the sender's domain. You can also use "Block This Sender" in the detail pane of the Email Analysis History, or the right-click menu.
- Built-in list: patterns of phishing domains made to look like real brands (for example
paypal-secure.com,apple-verify.…, and fake sites on a top-level domain the real brand does not use). The patterns are built not to match the legitimate domains.
Watch Domains (Untrusted Domains)
Domains that make a message "Dangerous" when they appear as the sender, in a link in the body or in the Reply-To. Unlike Blocked Senders (Blacklist), they can be softened, for example with Per-Sender Links.
- Built-in list: top-level domains reported to be frequently abused for phishing (about 70, such as .top, .xyz and .click; sources: Spamhaus, Interisle and others). Top-level domains widely used by legitimate businesses abroad, such as .info, are not included.
- Country and region domains such as Russia and China are controlled by Country and Region Top-Level Domains under Advanced Settings in "General".
- If a legitimate service uses a top-level domain on this list and appears as a link destination, adding it to Trusted Senders can prevent that warning. If it appears as the sender, register it in Per-Sender Links (adding it to Trusted Senders alone does not clear the warning for a sender).
Recommended ways to use it
Start with "Watch only"
- With the default, "Watch only", no verdict moves or flags mail; you are informed through the banner and the history only. Once you are used to the verdicts, choose an action under "Recommended Settings".
- "Needs Review" does not mean suspicious. It is a first-time sender, so check the sender's domain.
When legitimate mail gets flagged
- The sender is genuine but the links go to another domain → add it to Per-Sender Links with ⌃⌥A.
- Legitimate sites you use often → ⌃⌥A (Per-Sender Links), or add that sender to Trusted Senders with ⌃⌥S.
- Partners in China, Russia or similar → set that country or region to "Normal".
When you want it stricter
- Under "Recommended Settings", choose "Notify me about dangerous mail", "Move dangerous mail to Junk" or "Also highlight with colors" (if you move mail to Junk, check your Junk folder regularly).
- In Advanced Settings, turn off "Treat whitelisted senders as Links Verified unless other warnings appear".
- Set countries and regions you never deal with to "Blocked Senders".
Once you know the settings, check the criteria
See the detailed flow of how verdicts are made.